STUD MOUNT INSTALLATIONS
Installation patterns are recommended for stud mount installations and are available by Clicking Add Installation Pattern on the item total page.
If you have 2 signs you need 2 patterns.
TOOLS NEEDED
1) Masking Tape
2) Level
3) Drill & 1/4'' Drill Bit
4) Tube of Silicone
Go to Pad Mount Installations >>
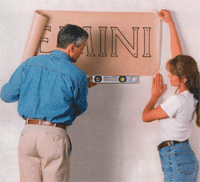
1) Tape one edge of the Installation pattern to the installation surface with masking tape and unroll it. Level the pattern and tape the other edge to the installation surface.

2) Drill 1/4"; holes 3 inches deep where indicated on your template. Remove the template and clean out all drill holes: a puff of air through a straw works well.

3) Screw the studs into the stud holes on the back of each letter. Now fill the drill holes in the wall of the first letter with silicone.

4) Push the tube of silicone over each stud on the first letter in order to evenly coat it with adhesive.
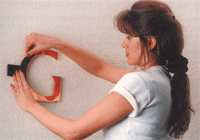
5) Push the letter into the drill holes, flush mount or use a shim to assure the proper standoff of the letter from the wall. Repeat steps 3 through 5 for the rest of the letters.
Shop, compare and order from over 15,000 sign letters, metal sign letters, cast metal sign letters, acrylic sign letters, plastic sign letters,
custom sign letters, foam sign letters and changeable sign letters - for all types of uses that are easy to install. Custom Exterior Signs,
custom interior signs, custom lobby signs, custom business signs, plaques, church signs, school signs, military signs, government signs
and retail signs - we’ve got you covered.
Call us with all of your signage questions, our friendly signage experts are here to help you.


